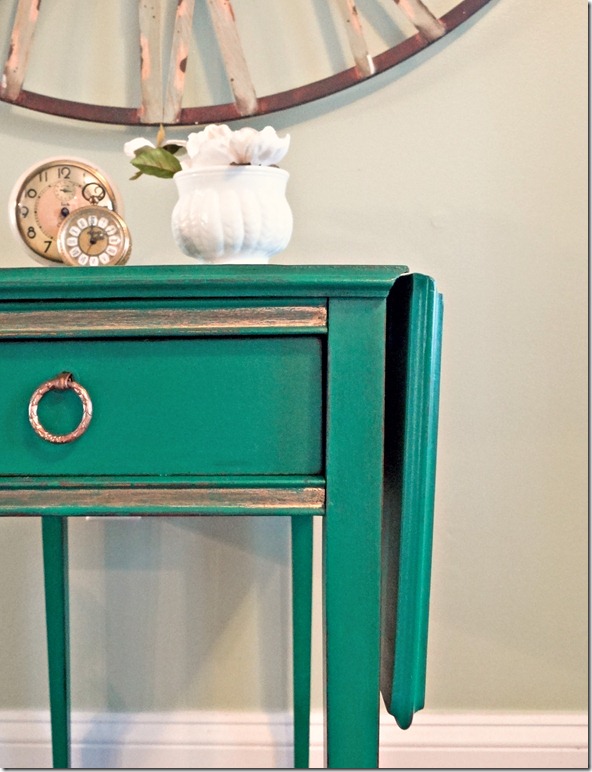
Well, I’m obviously a little late in the game today. After my post on the 2013 color of the year, I felt inspired to add a little emerald to my own life and had the perfect piece to begin my experiment. Unfortunately, that piece took a bit more sanding, filling, and gluing than initially expected! I’ve spent the last day and a half refurbishing a piece that should have taken no more than a few hours. But it was fun, nevertheless, and kept me entertained far into the night last night.
You can see how beat up the table was!
A large chunk of the laminate was peeling off, so I tore the whole thing off and power sanded the top:
I then used a quarter of a bottle of wood glue and almost an entire bottle of wood filler fixing and filling miscellaneous cracks and holes! Once the glue and filler were fully dry, I wiped down the entire piece and finally began painting the base layer in Annie Sloan’s Graphite…
(It was getting dark and cold outside so I had to lug the table into the warmth of my home for the paint to dry!)
With the base coat on and without any sanding between coats, I began applying Valspar’s Green Suede…
Emerald loveliness!
A single coat of the Green Suede over the Graphite actually looked fabulous – something I’ll keep in mind for the next project! – but I had a different vision with this piece so I applied a second coat, allowed it to fully dry, lightly distressed with 180-grit sandpaper, and then started applying the wax.
First, I used a small amount of Miss Mustard Seed’s furniture wax (just my preference these days, but any clear wax will do!), allowed it to sit for about 3 minutes, and then applied Annie Sloan’s dark wax. As usual, I always work in small sections using the dark wax, brushing on, and then buffing off with another coat of clear wax.
After the table was fully waxed and buffed, I decided to add in a little gold (you can’t go wrong with emerald and gold!) so I spray painted the drawer pull and also added a bit of gold paint detail…
And voila!
I love its style and the pop of color it brings. And as much as I’d love to keep it for myself…I have no more space in my house for miscellaneous furniture pieces! So come January, this little gem (get it??) will be in my space out in Greenwood.
LINKED TO:


Wow! That’s just beautiful Kristen.. sorry it was such a mess to get it to that point! Your photos are great too 🙂
Found your project at a link party, love your blog! I really enjoy your style.
Thanks so much Tracie! My style is always evolving, but I’m slowly starting to narrow it down and really define what I like. PS….I look forward to seeing an update on your own style via your living room renovation!
This I so simple and yet so stunning. I love it. Silver and emerald-a perfect paring.
Small House / Big Sky
White Oak Studio Designs/Hand-painted Vintage Furniture Transformations
BLOG: http://smallhouseunderabigsky.wordpress.com
Facebook: donnaallgaierlamberti@facebook.com
Thanks so much Donna! Simple and sweet has become much more my style these days 🙂 And speaking of simple and sweet, I love your grapevine Christmas tree! What a perfect rustic touch.
Your welcome Kristen. I use t sell these grapevine trees in the at White Oak gallery, made by a local artist. She used the sassafras branches off of our property. Of course I had to buy one for myself. It has held up well.
Very nice up-do! Thanks for linking up!
Kim
Best colour ever!!!!!!!!!!!!!!!
I am in love with this piece and the versatality of it too! I know how much work goes into sanding and dusting and painting a piece, you should be so proud!!!! ;D
Bethany, so sorry for the delayed response! It really is the best color ever 🙂
It’s so bold and glamorous but can so easily be softened with a rustic or neutral touch. One day I hope to paint a room (or at least an accent wall) in this color! I could just stare at it forever 🙂
This is a beautiful makeover! I found your blog by searching for emerald DIYs on Pinterest. 🙂 I wanted to let you know I’ve featured it on an emerald-themed roundup on my blog: http://jadeandfern.com/2013/03/22/embracing-emerald/
Pingback: Inspired By: Embracing Emerald Jade and Fern